Reverse Engineering MSC Bytecode — Script Data
While none of the information presented here requires you’ve read the first part, it is recommended you read it here. That part covers the file structure, this part will cover how to figure out how it works. (Quick disclaimer, a lot of this part was not originally done by me, it was done by the wonderful minds of @SammiHusky and dantarion (@dantarion on twitter), however all thoughts here are my own. While I did not have to do this part of the reverse engineering from scratch I did have to retrace it in order to have an understanding for latter things I’ve done with this knowledge.)
Getting Started
With just about just about anything reverse engineering related, the hardest part to figure out is how you initially start gaining an understanding. There isn’t really a trick to it, you just have to look for a way in. Sometimes you have nothing to go on and you just have to try a theory until it doesn’t work out. For bytecode you have to remember that, like in any bytecode/assembly language there will be patterns because code has patterns. Something you can, to a reasonable degree, guess and get it right. In this case we actually know there is a good chance it is variable size, as the script offsets don’t have any alignment pattern (for example in powerpc bytecode you know that each instruction will be at an offset divisible by 4 since each instruction is 32 bits wide.) Now for looking at patterns in the bytecode; If we look at some python code without understanding what it does at all
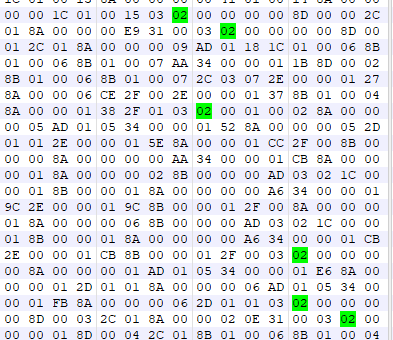
Some things we can immediately notice, ignoring words and names and whatever, which we wouldn’t have with a bytecode, are things like everything separated by 2 newlines (a blank line) begins with a def and ends with an unindent. It’s quite similar in the technique I used for figuring out how to translate the scripting data over. So, let’s check the start of every script offset. If we highlight all of the first byte from each script offset, we get something that looks like this:

Beginning and End
So there are a couple things worth noting here. First of all, as I sure hope you’ve noticed, the first byte is always 02. Secondly, the byte before is always 03 (except for the first script) and the last byte of the last script is 03. It is not too hard to connect the dots there and figure out that 02 is a command used at the start of every script and 03 is used at the very end of every script. One more useful thing to note is that most of the 02 bytes are followed by 4 null bytes, some of them are 3 null bytes and some other number, and a couple other ones have (null) number (null) number. Now what can we get from this? We can, with reasonable assurance, assume that it’s likely two shorts (2 byte integers) that are little endian for the following reasons:
-
The first byte is always 0, this leads me to believe it is the most significant byte
-
The third byte is never anything other than null, but the second byte can be something other than null.
This is why I believe it’s two shorts rather than a full int or four individual bytes or even separate commands. As for 03, not only does it make sense for the command added after begin being end but it makes sense for end to have no additional parameters. Think of it like C code:
We have
void* getAddressRelative(void* address, u32 length){
Which contains a lot of information at the start of the function and at the end we have
}
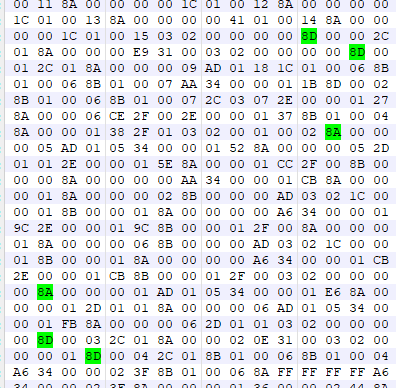
Which contains virtually no information, it just signifies an end. And while bytecode and C code certainly aren’t very comparable, this assumption is safe because we know every single script ends with it. Ok, so we know how a script starts (not either argument even) and how it ends, how does this help at all? Well since we have a good idea of the length of the begin command, this means we can sample some other commands since we know another command should follow right after. If I modify my 010 Editor template (really useful tool for this stuff, I have a repo with some examples also taken from smash on my github here) to highlight the sixth byte after every script offset. If you’re interested in how that looks I have uploaded it for those who’d like to try it out themselves.
The Bitfield
The result looks something like this:

and funny enough there’s a bit of a pattern here, lots of bytes starting with the hex digit 8, this is a great example of why hex editing is so useful. If we look at the two examples we see above they are in binary broken down as:
-
8A — 10001010
-
8D — 10001101
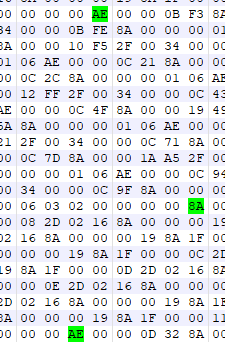
The way you can recognize this is that 8 is a power of two, often if you see a value in which a lot of values seem to be a power of two you should check for bitfields or at least consider the option. A bitfield (for those unaware) is when instead of using an entire byte as 0 or 1, you have multiple booleans (true/false) stored in the same byte, with each bit taking up a field. In the above example the first bit is likely a bitfield due to the fact we see it as the only bit on the upper half of the byte used in a lot of these examples. With regular progressing numbers you don’t usually see this because you have to get through the bottom 128 values before this bit would be used. Since we don’t see the 2nd, 3rd, and 4th bits being used a lot we can assume this is a bitfield… but for what? We know it is a modifier for the command itself, as it is grouped in with the command. But since we don’t have much more information we’ll just have to keep that in the back of our minds. If we take a deeper look at some of these commands starting with 8 we’ll find that 8A is followed by a 4 byte int and 8D is followed by a 2 byte int. For finding this, you use the same methods as mentioned before of looking at the number of 00s you encounter, what byte order it’s in (big endian/little endian) and a bit of guess and check to see what matches up. We can even see a 8A at the bottom of the screenshot posted above that has 8A FF FF FF FF, which seems to follow this pretty well, so we can probably carry on without worry. If we take a look at some other highlighted bytes we’ll find that — oh no — they don’t start with 8.

but if we break it down to binary again we’ll find that it is the same sort of deal but actually using some of the upper bits. In this case we have 10101110 at this point it’s hard to say if it’s another part of the bitfield or if it is part of the command number. The only “real” evidence against it being another bitfield is another highlighted byte being 2E which either means the bit could be entirely separate from the most significant bit or it’s a part of the number. Looking at all the commands with this MSB (how I’ll abbreviate most significant bit now) they all have a number following them. This might mean something as far as something being done with the value but we can’t be entirely sure. The rest of this process doesn’t however have much we can do with this, we can guesstimate which bytes are command bytes and which are parameters for those commands and we can try and get a simple, unlabeled disassemble working. This allows us to see frequency of commands, patterns of which command comes before which, etc. This process is rather boring and is essentially the same as begin/end, just look around and try and look for patterns to figure out the size of the parameters. While this does leave you with disassembly that looks like
    begin 0x0, 0x0
->  unk_2E 0x24A
->  unk_A 0x0
    end
You can find subtle patterns in it. Things such as a set of commands only being used if the second argument of begin is greater than 0 (which is the case, the second argument is the local variable count) or something like the first parameter of begin only being greater than 0 if the script returned a value, etc. While this isn’t an easy part it took Sammi Husky and Dantarion a lot of banging their heads on the wall to get not even half of the commands documented, and they are more experienced than I. After they had done a lot of the initial analysis of this bytecode was when I started contributing, and my methods were a bit different after a while of having similar issues. Things such as them thinking begin had 4 1 byte parameters were a thing and this later had to be fixed. It’s a bit of an iterative process and for simpler bytecodes it’s much easier. However for some of the more complex instructions I had to look elsewhere for answers.
Conclusion
If you’d like to learn more about MSC works read through my wiki tutorial on my pymsc repository. If you’d like to learn about my methods for figuring out the remaining half of the syscalls follow me here on medium or on twitter. So you don’t miss out on when I post it. It should hopefully be more in depth than this step as for this step I only really felt comfortable with the parts I personally had to rework in order to figure out issues I was having with Sammi/Dant’s interpretation of MSC. If you have any questions/comments/concerns feel free to comment or hit me up on twitter and I appreciate any and all feedback be it corrections or any other form of engagement.
